4. Building your own drivers
In this part of the tutorial, we are going to build the driver of an hypothetical signal generator. Following a tutorial about building a driver to communicate with an instrument that you do not have is not much fun. That’s why we have created a virtual version of this instrument. From the command line, run the following command:
$ lantz-sim fungen tcp
This will start an application that listens for incoming TCP packages on port 5678 from localhost.
Note
If you have done the previous tutorial, you will build from scratch the same driver that is included in Lantz.
4.1. The instrument
The signal generator has the following characteristics:
1 Analog output
- Frequency range: 1 Hz to 100 KHz
- Amplitude (0-Peak): 0 V to 10 V
- Offset: -5V to 5V
- Waveforms: sine, square, triangular, ramp
8 Digital outputs
8 Digital inputs
Your program will communicate with the instrument communicates exchanging messages via TCP protocol over ethernet. Messages are encoding in ASCII and line termination is LF (Line feed, ‘n’, 0x0A, 10 in decimal) for both sending and receiving.
The following commands are defined:
| Command | Description | Example command | Example response |
|---|---|---|---|
| ?IDN | Get identification | ?IDN | LSG Serial #1234 |
| ?FRE | Get frequency [Hz] | ?FRE | 233.34 |
| ?AMP | Get amplitude [V] | ?AMP | 8.3 |
| ?OFF | Get offset [V] | ?OFF | 1.7 |
| ?OUT | Get output enabled state | ?OUT | 1 |
| ?WVF W | Get waveform | ?WVF | 2 |
| ?DOU D | Get digital output state | ?DOU 4 | 0 |
| ?DIN D | Get digital input state | ?DIN 19 | ERROR |
| !FRE F | Set frequency [Hz] | !FRE 20.80 | OK |
| !AMP F | Set amplitude [V] | !AMP 11.5 | ERROR |
| !OFF F | Set offset [V] | !OFF -1.2 | OK |
| !WVF W | Set waveform | !WVF 3 | OK |
| !OUT B | Set output enabled state | !OUT 0 | OK |
| !DOU D B | Set digital output state | !DOU 4 1 | OK |
| !CAL | Calibrate system | !CAL | OK |
As shown in the table, commands used to get the state of the instrument start with ? and commands used to set the state start with !. In the Command column:
- D is used to indicate the digital input or output channel being addressed (1-8)
- F is the value of a float parameter. The actual valid range for each parameter depends on the command itself.
- W is used to indicate the desired waveform (0: sine, 1:square, 2:triangular, 3: ramp)
- B is the state of the digital input or output channel (0 is off/low, 1 is on/high), or the state of the analog ourput (0 off/disabled, 1 on/enabled)
The response to successful GET commands is the requested value. The response to successful SET commands is the string OK. If the command is invalid or an occurs in the instrument, the instrument will respond with the string ERROR. For example, the command ?DIS 19 is invalid because the parameter B should be in [1, 8].
4.2. A basic driver
- Having look at the instrument, we will now create the driver. Open the project folder that you created in the previous tutorial (Using lantz drivers). Create a python file named mydriver.py (I know is a bad name but it is just to stress that
- it is yours) and change it to look like this:
from lantz import Feat
from lantz.messagebased import MessageBasedDriver

class LantzSignalGenerator(MessageBasedDriver):
    """Lantz Signal Generator.
    """

    DEFAULTS = {'COMMON': {'write_termination': '\n',
                           'read_termination': '\n'}}

    @Feat()
    def idn(self):
        return self.query('?IDN')


if __name__ == '__main__':
    with LantzSignalGenerator('TCPIP::localhost::5678::SOCKET') as inst:
        print('The identification of this instrument is : ' + inst.idn)
The code is straight forward. We first import :class:MessageBasedDriver from :mod:lantz.messagebased (the Lantz module for message based instruments). MessageBasedDriver is a base class (derived from :class:Driver) that implements methods to communicate via different protocols. Our driver will derive from this.
We also import Feat from lantz. Feat is the Lantz pimped property and you use Feat just like you use property. By convention Feats are named using nouns or adjectives. Inside the method (in this case is a getter) goes the code to communicate with the instrument. In this case we use query, a method present in :class:MessageBasedDrivers. query sends a message to the instrument, waits for a response and returns it. The argument is the command to be sent to the instrument. Lantz takes care of formatting (encoding, endings) and transmitting the command appropriately. That’s why we define :ref:_defaults_dictionary at the beginning of the class. You can find more information about in the guides, but for now on, we will just point out that the key COMMON is used to tell Lantz that the following keyword arguments are for all instrument types (USB, GPIB, etc). In particular we specify that the read and write termination are ‘n’.
Finally, inside the __name__ == ‘__main__’ we instantiate the SignalGenerator (as we have seen in :ref:using and we print the identification.
If you have the simulator running, you can test your new driver. From the command line, cd into the project directory and then run the following command:
$ python mydriver.py
Note
If you have different versions of python installed, remember to use the one in which you have installed Lantz. You might need to use python3 instead of python.
You should see LSG Serial #1234 in the console.
Let’s allow our driver to control the instruments amplitude:
from lantz import Feat
from lantz.network import MessageBasedDriver

class LantzSignalGenerator(MessageBasedDriver):
    """Lantz Signal Generator.
    """

    DEFAULTS = {'COMMON': {'write_termination': '\n',
                           'read_termination': '\n'}}

    @Feat()
    def idn(self):
        """Identification.
        """
        return self.query('?IDN')


    @Feat()
    def amplitude(self):
        """Amplitude (0 to peak) in volts.
        """
        return float(self.query('?AMP'))

    @amplitude.setter
    def amplitude(self, value):
        self.query('!AMP {:.1f}'.format(value))


if __name__ == '__main__':
    from time import sleep
    from lantz.log import log_to_screen, DEBUG

    log_to_screen(DEBUG)
    with LantzSignalGenerator('TCPIP::localhost::5678::SOCKET') as inst:
        print('The identification of this instrument is : ' + inst.idn)
        print('Setting amplitude to 3')
        inst.amplitude = 3
        sleep(2)
        inst.amplitude = 5
        print('Current amplitude: {}'.format(inst.amplitude))
We have defined another Feat, now with a getter and a setter. The getter sends ?AMP and waits for the answer which is converted to float and returned to the caller. The setter send !AMP concatenated with the float formatted to string with two decimals. Run the script. Check also the window running lantz-sim. You should see the amplitude changing!.
In the current version of this driver, if we try to set the amplitude to 20 V the command will fill in the instrument but the driver will not know. Lets add some error checking:
# import ...

class LantzSignalGenerator(MessageBasedDriver):

    # Code from previous example
    # ...

    @amplitude.setter
    def amplitude(self, value):
        if self.query('!AMP {:.2f}'.format(value)) != "OK":
            raise Exception
Is that simple. We just check the response. If different from OK we raise an Exception. Change the script to set the amplitude to 20 and run it one more time. You should something like this in the log:
Exception: While setting amplitude to 20.
We do not know why the command has failed but we know which command has failed.
Because all commands should be checked for ERROR, we will override query to do it. Reset amplitude to the original and add the following, add the following import to the top of the file, and redefine the query function to the class:
# import ...
from lantz.errors import InstrumentError

class LantzSignalGenerator(MessageBasedDriver):

    # Code from previous example
    # ...

    @amplitude.setter
    def amplitude(self, value):
        self.query('!AMP {:.1f}'.format(value))

    def query(self, command, *, send_args=(None, None), recv_args=(None, None)):
        answer = super().query(command, send_args=send_args, recv_args=recv_args)
        if answer == 'ERROR':
            raise InstrumentError
        return answer
The query function mediates all queries to the instrument. In our redefined version, we call the original first (super().query(...)) and then we check for errors. In this way we have added error checking for all queries!.
4.3. Putting units to work
Hoping that the Mars Orbiter story convinced you that using units is worth it, let’s modify the driver to use them:
from lantz import Feat
from lantz.network import MessageBasedDriver
from lantz.errors import InstrumentError

class LantzSignalGenerator(MessageBasedDriver):
    """Lantz Signal Generator.
    """

    DEFAULTS = {'COMMON': {'write_termination': '\n',
                           'read_termination': '\n'}}

    def query(self, command, *, send_args=(None, None), recv_args=(None, None)):
        answer = super().query(command, send_args=send_args, recv_args=recv_args)
        if answer == 'ERROR':
            raise InstrumentError
        return answer

    @Feat()
    def idn(self):
        return self.query('?IDN')


    @Feat(units='V')
    def amplitude(self):
        """Amplitude (0 to peak)
        """
        return float(self.query('?AMP'))

    @amplitude.setter
    def amplitude(self, value):
        self.query('!AMP {:.1f}'.format(value))


if __name__ == '__main__':
    from time import sleep
    from lantz import Q_
    from lantz.log import log_to_screen, DEBUG

    volt = Q_(1, 'V')
    milivolt = Q_(1, 'mV')

    log_to_screen(DEBUG)
    with LantzSignalGenerator('TCPIP::localhost::5678::SOCKET') as inst:
        print('The identification of this instrument is : ' + inst.idn)
        print('Setting amplitude to 3')
        inst.amplitude = 3 * volt
        sleep(2)
        inst.amplitude = 1000 * milivolt
        print('Current amplitude: {}'.format(inst.amplitude))
We have just added in the Feat definition that the units is Volts. Lantz uses the Pint package to manage units. We now import Q_ which is a shortcut for Pint.Quantity and we declare the volt and the milivolt. We now set the amplitude to 3 Volts and 1000 milivolts.
Run the script and notice how Lantz will do the conversion for you. This allows to use the output of one instrument as the output of another without handling the unit conversion. Additionally, it allows you to replace this signal generator by another that might require the amplitude in different units without changing your code.
4.4. Limits
When the communication round-trip to the instrument is too long, you might want to catch some of the errors before hand. You can use limits to check for valid range of the parameter. Limits syntax is:
limits([start,] stop[, step])

limits(10)          # means from 0 to 10 (the 10 is valid)
limits(2, 10)       # means from 2 to 10 (the 10 is valid)
limits(2, 10, 2)    # means from 2 to 10, with a step of 2 (the 10 is valid)
If you provide a value outside the valid range, Lantz will raise a ValueError. If the steps parameter is set but you provide a value not compatible with it, it will be silently rounded. Let’s put this to work for amplitude, frequency and offset:
from lantz import Feat
from lantz.network import MessageBasedDriver
from lantz.errors import InstrumentError

class LantzSignalGenerator(MessageBasedDriver):
    """Lantz Signal Generator
    """

    DEFAULTS = {'COMMON': {'write_termination': '\n',
                           'read_termination': '\n'}}


    def query(self, command, *, send_args=(None, None), recv_args=(None, None)):
        answer = super().query(command, send_args=send_args, recv_args=recv_args)
        if answer == 'ERROR':
            raise InstrumentError
        return answer

    @Feat()
    def idn(self):
        return self.query('?IDN')

    @Feat(units='V', limits=(10,)) # This means 0 to 10
    def amplitude(self):
        """Amplitude.
        """
        return float(self.query('?AMP'))

    @amplitude.setter
    def amplitude(self, value):
        self.query('!AMP {:.1f}'.format(value))

    @Feat(units='V', limits=(-5, 5, .01)) # This means -5 to 5 with step 0.01
    def offset(self):
        """Offset
        """
        return float(self.query('?OFF'))

    @offset.setter
    def offset(self, value):
        self.query('!OFF {:.1f}'.format(value))

    @Feat(units='Hz', limits=(1, 1e+5)) # This means 1 to 1e+5
    def frequency(self):
        """Frequency
        """
        return float(self.query('?FRE'))

    @frequency.setter
    def frequency(self, value):
        self.query('!FRE {:.2f}'.format(value))
If you try to set a value outside the valid range, a ValueErorr will be raised and the command will never be sent to the instrument. Give it a try:
inst.amplitude = 20
Automatic rounding:
inst.offset = 0.012 # rounded to 0.01
4.5. Mapping values
We will define offset and frequency like we did with amplitude, and we will also define output enabled and waveform:
from lantz import Feat, DictFeat
from lantz.network import MessageBasedDriver
from lantz.errors import InstrumentError

class LantzSignalGenerator(MessageBasedDriver):
    """Lantz Signal Generator
    """

    DEFAULTS = {'COMMON': {'write_termination': '\n',
                           'read_termination': '\n'}}


    def query(self, command, *, send_args=(None, None), recv_args=(None, None)):
        answer = super().query(command, send_args=send_args, recv_args=recv_args)
        if answer == 'ERROR':
            raise InstrumentError
        return answer

    @Feat()
    def idn(self):
        return self.query('?IDN')

    @Feat(units='V', limits=(10,))
    def amplitude(self):
        """Amplitude.
        """
        return float(self.query('?AMP'))

    @amplitude.setter
    def amplitude(self, value):
        self.query('!AMP {:.1f}'.format(value))

    @Feat(units='V', limits=(-5, 5, .01))
    def offset(self):
        """Offset.
        """
        return float(self.query('?OFF'))

    @offset.setter
    def offset(self, value):
        self.query('!OFF {:.1f}'.format(value))

    @Feat(units='Hz', limits=(1, 1e+5))
    def frequency(self):
        """Frequency.
        """
        return float(self.query('?FRE'))

    @frequency.setter
    def frequency(self, value):
        self.query('!FRE {:.2f}'.format(value))

    @Feat(values={True: 1, False: 0})
    def output_enabled(self):
        """Analog output enabled.
        """
        return int(self.query('?OUT'))

    @output_enabled.setter
    def output_enabled(self, value):
        self.query('!OUT {}'.format(value))

    @Feat(values={'sine': 0, 'square': 1, 'triangular': 2, 'ramp': 3})
    def waveform(self):
        return int(self.query('?WVF'))

    @waveform
    def waveform(self, value):
        self.query('!WVF {}'.format(value))

if __name__ == '__main__':
    from time import sleep
    from lantz import Q_
    from lantz.log import log_to_screen, DEBUG

    volt = Q_(1, 'V')
    milivolt = Q_(1, 'mV')
    Hz = Q_(1, 'Hz')

    log_to_screen(DEBUG)
    with LantzSignalGenerator('TCPIP::localhost::5678::SOCKET') as inst:
        print('The identification of this instrument is : ' + inst.idn)
        print('Setting amplitude to 3')
        inst.amplitude = 3 * volt
        inst.offset = 200 * milivolt
        inst.frequency = 20 * Hz
        inst.output_enabled = True
        inst.waveform = 'sine'
We have provided output_enabled a mapping table through the values argument. This has two functions:
- Restricts the input to True or False.
- For the setter converts True and False to 1 and 0; and vice versa for the getter.
This means that we can write the body of the getter/setter expecting a instrument compatible value (1 or 0) but the user actually sees a much more friendly interface (True or False). The same happens with waveform. Instead of asking the user to memorize which number corresponds to ‘sine’ or implement his own mapping, we provide this within the feat.
4.6. Beautiful Testing
Testing in the command line is extermely useful but sometimes it is desirable to have simple GUI to be used as a test panel. Lantz gives you that with no effort. Just change the main part to this:
if __name__ == '__main__':
    from lantz.ui.qtwidgets import start_test_app

    with LantzSignalGenerator('TCPIP::localhost::5678::SOCKET') as inst:
        start_test_app(inst)
and you will get something like this:
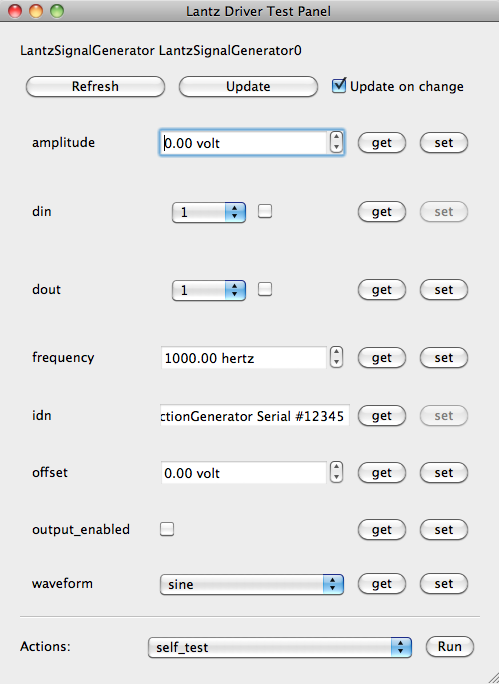
Cool, right? Using Python amazing introspection capabilites together with Feat annotations inside the driver, Lantz was able to build on-the-fly a Graphical User Interface for testing purposes.
Among other things, you get:
- The right widget, for the right datatype: Check-box for boolean, Combo-box for options, etc.
- When a Feat has units, the suffix is displayed. You can also press the u key to change the displayed units.
- Minimum and Maximum values when a Feat has limits
... and much more! All of this without an extra line of code.
4.7. Properties with items: DictFeat
It is quite common that scientific equipment has many of certain features (such as axes, channels, etc). For example, this signal generator has 8 digital outputs. A simple solution would be to access them as feats named dout1, dout2 and so on. But this is not elegant (consider a DAQ with 32 digital inputs) and makes coding to programatically access to channel N very annoying. To solve this Lantz provides a dictionary like feature named DictFeat. Let’s see this in action:
# import ...

class LantzSignalGenerator(MessageBasedDriver):

    # Code from previous example
    # ...

    @DictFeat(values={True: 1, False: 0})
    def dout(self, key):
        """Digital output state.
        """
        return int(self.query('?DOU {}'.format(key)))

    @dout.setter
    def dout(self, key, value):
        self.query('!DOU {} {}'.format(key, value))
In the driver definition, very little has changed. DictFeat acts like the standard Feat decorator but operates on a method that contains one extra parameter for the get and the set in the second position.
You will use this in the following way:
inst.dout[4] = True
By default, any key (in this case, channel) is valid and Lantz leaves to the underlying instrument to reject invalid ones. In some cases, for example when the instrument does not deal properly with unexpected parameters, you might want to restrict them using the optional parameter keys
# import ...

class LantzSignalGenerator(MessageBasedDriver):

    # Code from previous example
    # ...

    @DictFeat(values={True: 1, False: 0}, keys=list(range(1,9)))
    def dout(self, key):
        """Digital output state.
        """
        return int(self.query('?DOU {}'.format(key)))

    @dout.setter
    def dout(self, key, value):
        self.query('!DOU {} {}'.format(key, value))
Remember that range(1, 9) excludes 9. In this way, Lantz will Raise an exception without talking to the instrument when the following code:
>>> inst.dout[10] = True
Traceback:
    ...
KeyError: 10 is not valid key for dout [1, 2, 3, 4, 5, 6, 7, 8]
We will create now a read-read only DictFeat for the digital input:
# import ...

class LantzSignalGenerator(MessageBasedDriver):

    # Code from previous example
    # ...

    @DictFeat(values={True: 1, False: 0}, keys=list(range(1,9)))
    def din(self, key):
        """Digital input state.
        """
        return int(self.query('?DIN {}'.format(key)))
4.8. Drivers methods: Action
Bound methods that will trigger interaction with the instrument are decorated with Action:
from lantz import Feat, DictFeat, Action
and within the class we will add:
@Action()
def calibrate(self):
    self.query('!CAL')
You can use the the driver that you have created in you projects. Learn how in the next part of the tutorial: A simple command line app.