Building a GUI without Backend/Frontend
If you are a long time PyQt user, you might have asked yourself: Do I really need to use the :class:Backend and :class:Frontend classes? The answer is No. Lantz helps you, but only if you want it. You can do everything yourself and this guide shows you how.
Start the simulated instrument running the following command:
$ lantz-sim fungen tcp
Using Qt Designer, create a window like this:
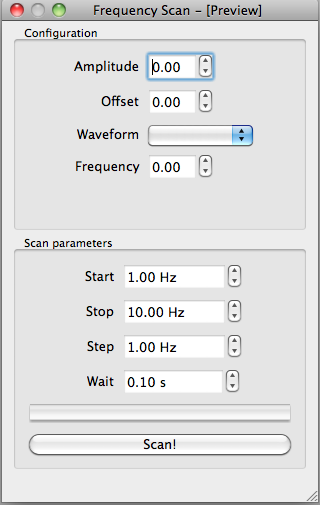
and save it as fungen.ui in the folder in which you have created
the driver (Building your own drivers). For the example, we have labeled
each control as corresponding label in lower caps (amplitude, offset,
waveform, start, stop, step, wait). The button is named scan.
You can also download
the ui file if you prefer.
We will now add the code to do the actual frequency scan. We will reuse the function from the last tutorial:
import sys

from lantz import Q_

# Import Qt related from lantz so it worsk with PyQt4 or PySide ...
from lantz.utils.qt import QtGui

# These imports are from your own project
from mydriver import LantzSignalGenerator
from scanfrequency import scan_frequency

app = QtGui.QApplication(sys.argv)

# Load the UI from the QtDesigner file. You can also use pyuic4 to generate a class.
main = QtGui.loadUi('scanfrequency.ui')

Hz = Q_(1, 'Hz')
sec = Q_(1, 'second')

with LantzSignalGenerator('TCPIP::localhost::5678::SOCKET') as inst:

    # Obtain a reference to the widgets controlling the scan parameters
    start = main.findChild((QtGui.QWidget, ), 'start')
    stop = main.findChild((QtGui.QWidget, ), 'stop')
    step = main.findChild((QtGui.QWidget, ), 'step')
    wait = main.findChild((QtGui.QWidget, ), 'wait')
    scan = main.findChild((QtGui.QWidget, ), 'scan')

    # Define a function to read the values from the widget and call scan_frequency
    def scan_clicked():
        scan_frequency(inst, start.value() * Hz, stop.value() * Hz,
                       step.value() * Hz, wait.value() * sec)

    # Connect the clicked signal of the scan button to the function
    scan.clicked.connect(scan_clicked)

    # Scan the app
    main.show()
    exit(app.exec_())
When the button is clicked, Qt will emit a signal which is connected to the function we have defined the application should scan the frequency. You will not see anything happening in the Window, but if you look in the simulator console you will see the frequency changing.
Connecting widgets to Feats
To allow the user to change the amplitude, offset, shape and frequency, we will connect the configuration widgets:
import sys

from lantz import Q_

# Import Qt related from lantz so it worsk with PyQt4 or PySide ...
from lantz.utils.qt import QtGui

# Import from lantz a function to connect drivers to UI <--- NEW
from lantz.ui.widgets import connect_driver

# These imports are from your own project
from mydriver import LantzSignalGenerator
from scanfrequency import scan_frequency

app = QtGui.QApplication(sys.argv)

# Load the UI from the QtDesigner file. You can also use pyuic4 to generate a class.
main = QtGui.loadUi('scanfrequency.ui')

Hz = Q_(1, 'Hz')
sec = Q_(1, 'second')

with LantzSignalGenerator('TCPIP::localhost::5678::SOCKET') as inst:

    # Obtain a reference to the widgets controlling the scan parameters
    start = main.findChild((QtGui.QWidget, ), 'start')
    stop = main.findChild((QtGui.QWidget, ), 'stop')
    step = main.findChild((QtGui.QWidget, ), 'step')
    wait = main.findChild((QtGui.QWidget, ), 'wait')
    scan = main.findChild((QtGui.QWidget, ), 'scan')

    # <--------- This is new --------->
    connect_driver(main, inst)

    progress = main.findChild((QtGui.QWidget, ), 'progress')

    def update_progress_bar(new, old):
        fraction = (new.magnitude - start.value()) / (stop.value() - start.value())
        progress.setValue(fraction * 100)

    inst.frequency_changed.connect(update_progress_bar)


    # Define a function to read the values from the widget and call scan_frequency
    def scan_clicked():
        scan_frequency(inst, start.value() * Hz, stop.value() * Hz,
                       step.value() * Hz, wait.value() * sec)

    # Connect the clicked signal of the scan button to the function
    scan.clicked.connect(scan_clicked)

    # Scan the app
    main.show()
    exit(app.exec_())
The function connect_driver matches by name Widgets to Feats and then connects them. Under the hood, for each match it:
1.- Wraps the widget to make it Lantz compatible.
2.- If applicable, configures minimum, maximum, steps and units.
3.- Add a handler such as when the widget value is changed, the Feat is updated.
4.- Add a handler such as when the Feat value is changed, the widget is updated.
You can learn more and some alternatives in Connecting a custom UI to a driver.
To update the progress bar, we connected the frequency_changed signal to a function that updates the progress bar.
Run this example and test how you can change the amplitude, offset and waveform:
$ python scanfrequency-gui.py
However, you will see that the frequency and the progress bar are not updated during the scan.
Using a background thread
The drawback of the previous (simple) approach is that the scan is executed in the same thread as the GUI, effectively locking the main window and making the application unresponsive. Qt Multithreading programming is out of the scope of this tutorial (checkout Threads in Qt for more info), but we will provide some examples how to do it:
import sys

# Import Qt related from lantz so it worsk with PyQt4 or PySide ...
from lantz.utils.qt import QtGui, QtCore

from lantz import Q_

# Import from lantz a function to connect drivers to UI
from lantz.ui.widgets import connect_driver

# These imports are from your own project
from mydriver import LantzSignalGenerator
from scanfrequency import scan_frequency

app = QtGui.QApplication(sys.argv)

# Load the UI from the QtDesigner file. You can also use pyuic4 to generate a class.
main = QtGui.loadUi('scanfrequency.ui')

Hz = Q_(1, 'Hz')
sec = Q_(1, 'second')

with LantzSignalGenerator('TCPIP::localhost::5678::SOCKET') a as inst:

    # Connect the main panel widgets to the instruments Feats,
    # matching by name
    connect_driver(main, inst)

    # Obtain a reference to the widgets controlling the scan parameters
    start = main.findChild((QtGui.QWidget, ), 'start')
    stop = main.findChild((QtGui.QWidget, ), 'stop')
    step = main.findChild((QtGui.QWidget, ), 'step')
    wait = main.findChild((QtGui.QWidget, ), 'wait')
    scan = main.findChild((QtGui.QWidget, ), 'scan')
    progress = main.findChild((QtGui.QWidget, ), 'progress')

    def update_progress_bar(new, old):
        fraction = (new.magnitude - start.value()) / (stop.value() - start.value())
        progress.setValue(fraction * 100)

    inst.frequency_changed.connect(update_progress_bar)

    # <--------- New code--------->
    # Define a function to read the values from the widget and call scan_frequency
    class Scanner(QtCore.QObject):

        def scan(self):
            # Call the scan frequency
            scan_frequency(inst, start.value() * Hz, stop.value() * Hz,
                           step.value() * Hz, wait.value() * sec)
            # When it finishes, set the progress to 100%
            progress.setValue(100)

    thread = QtCore.QThread()
    scanner = Scanner()
    scanner.moveToThread(thread)
    thread.start()

    # Connect the clicked signal of the scan button to the function
    scan.clicked.connect(scanner.scan)

    app.aboutToQuit.connect(thread.quit)
    # <--------- End of new code --------->

    main.show()
    exit(app.exec_())
In Qt, when a signal is connected to a slot (a function of a QObject), the execution occurs in the Thread of the receiver (not the emitter). That is why we moved the QObject to the new thread.
Note
On a production app it would be good to add a lock to prevent the application from exiting or calling the scanner while a scanning is running.
:class:Backend and :class:Frontend provides an easier way to deal with all of these, allowing you to focus in your code not in how to connect everything.